How To Guide... Fitting Door Hinges
12 February 2020 :: How To Guides & Hinges
How To Guide... Fitting Door Hinges
Fitting Hinges
It is essential when fitting door hinges that the door frame is vertically and horizontally plumb, especially the hinge side as the pivot point of all hinges requires to be the same for correct operation. Misalignment can cause the integrity of the hinge and any other hardware components to become compromised, leading to the breakdown of the doorset operation. Always refer to manufactures installation instructions for any special requirements.
If intumescent pads are being fitted behind the hinge leaf for fire regulations, ensure to increase the mortice depth accordingly.
Door Hinge Spacing
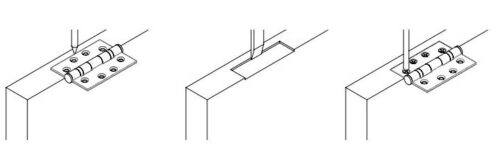
The leaf with the end of knuckle configuration should be fitted to the frame. At the determined spacing, position the hinge leaf (internal knuckle configuration) to the door so that the edge of leaf by knuckle is flush with edge of door and mark around leaf. Repeat at each hinge position.
Mortice out door to equal the thickness of the hinge leaf. The mortice should be smooth and any shavings or swarf must be removed. Position leaf into mortice, mark the fixing holes, pilot drill to suit the fixing screws. Secure the hinge leaf to the door using screws provided and repeat for other hinges on the door.
Offer the door up to the door frame. Pack under the door leaf to required clearance. Once in the required position, open the top hinge leaf flat against the frame so that the knuckle crank line is slightly proud of the edge and mark around the hinge leaf. Repeat at each hinge position.
Mortice out frame to equal the thickness of the hinge leaf as was done on door. Position leaf into mortice, pilot drill the fixing holes and secure with screws provided and repeat for remaining hinges. Mortice out frame to equal the thickness of the hinge leaf as was done on door. Position leaf into mortice, pilot drill the fixing holes and secure with screws provided and repeat for remaining hinges.
Another issue is how the hinges should be spaced on the door - where exactly should the hinges be fitted. This can depend on the weight of the door and whether a door closer is being used or not.
Hinge Fitting
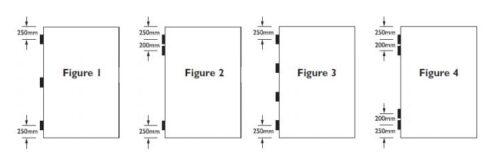
Figure 1 – The standard practice and most common, providing maximum resistance to “warping”, hinges are spaced as shown.
Figure 2 – Where overhead door closers are used, additional lateral forces are applied to the top hinge. Whilst this is taken into consideration within the design calculation, to reduce the lateral force on the top hinge, it is recommended that the hinges are spaced as shown.
Figure 3 – Where the door width is more than 1000mm or the door mass exceeds that allowed for 3 hinges, additional hinges can be fitted. Equal spacing shown provides maximum resistance to “warping”. Based on 4 hinges, the design door mass can be calculated as per “Side Load Calculation” table before determining the suitable grade of the hinge.
Figure 4 – where overhead closers are used within the example illustrated in Figure 3, due to the increased lateral forces created by the closer on the top hinge, it is recommended that the hinges are spaced as shown.
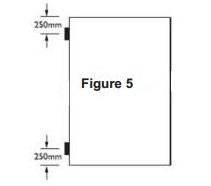
Figure 5 - The standard practice for fitting rising butt hinges. Assistance should be sought from the manufacturer in circumstances where a 3rd hinge is required as a co-axial point must be maintained.
More Handles has a huge range of door hinges to suit every application. To ensure you get the perfect solution for your door please give us a call and we will be happy to answer any questions.
EMAIL - sales@morehandles.co.uk
TEL - 01228 516516